Hacking WPA/WPA2 without dictionary/bruteforce
Fluxion (linset)
I hadn't ventured into Hackforums since a while, and this time when I went there I saw a thread about a script called
Fluxion. It's based on another script called
linset (actually
it's no much different from linset, think of it as an improvement, with
some bug fixes and additional options). I did once think about (and was
asked in a comment about) using something like a man in the middle
attack/ evil twin attack to get WPA password instead of going the
bruteforce/dictionary route, but never looked the idea up on the
internet nor spent much time pondering over it. However, once I saw the
thread about this cool script, I decided to give it a try. So in this
post I'll show you how I used Fluxion, and how you can too.
Disclaimer : Use this tool only on networks you own .Don't do anything illegal.
Contents
- Checking if tool is pre-installed, getting it via github if it isn't.
- Running the script, installing dependencies if required.
- Quick overview of how to use Fluxion.
- Detailed walk-through and demonstration with text explanation and screenshots
- Video demonstration (not identical to the written demo, but almost the same)
- Troubleshooting section
Just double checking

The
first thing I did was make sure that Kali doesn't already have this
tool. Maybe if you are reading this post a long time after it was
written, then you might have the tool pre-installed in Kali. In any
case, try this out:
fluxion
I, personally tried to check if linset or fluxion came pre-installed in Kali (though I didn't expect them to be there).
Getting the script
Getting the script is just a matter of cloning the github repository. Just use the git command line tool to do it.
If you have any problems with this step, then you can just naviagate to the
repostitory and manually download the stuff.
Update : There seems to be some legal trouble
with Fluxion. The creator of the script has removed the source code of
the tool, and uploaded code that is supposed to delete fluxion from your
computer. I don't know the specifics of what is going on, but will
provide updates ASAP.
Update : Now the repository is gone altogether!
What this means : As of now, this tutorial is useless. If you can find
the source code for Fluxion, then you can use it and continue with the
tutorial. Otherwise, not much can be done without the tool.

Update Again!
You can try this repo -
https://github.com/wi-fi-analyzer/fluxion. It's an old version, might or might not work.
git clone https://github.com/wi-fi-analyzer/fluxion
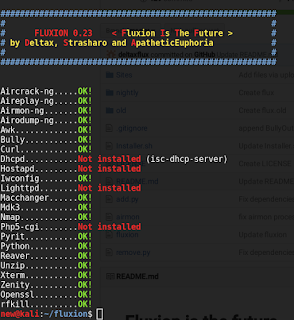 |
| There are 4 dependencies that need to be installed |
Running the script
Just navigate to the fluxion directory or the directory containing the
scripts in case you downloaded them manually. If you are following the
terminal commands I'm using, then it's just a simple change directory
command for you:
cd fluxion
Now, run the script.
sudo ./fluxion
Dependencies
If you have any unmet dependencies, then run the installer script.
sudo ./Installer.sh

I
had 4 unmet dependencies, and the installer script run was a buggy
experience for me (though it might be becuase I have completely screwed
up my system, editing files I wasn't supposed to and now I can't get
them back in order) .It got stuck multiple times during the process, and
I had to ctrl+c my way out of it many times (though ctrl+c didn't
terminate the whole installer, just the little update popup). Also, I
ran the installer script twice and that messed up with some of the
apt-get settings. I suggest that after installation is complete, you
restore your /etc/apt/sources.list to it's original state, and remove
the bleeding edge repositories (unless you know what you're doing). To
know what your repository should look like,
take a look here.
Anyways, one way or the other, your unmet dependencies will be resolved, and then you can use Flexion.
PS: For those trying to use apt-get to install the missing stuff - some
of the dependencies aren't available in the default Kali repos, so
you'll have to let the script do the installation for you, or manually
add the repos to /etc/apt/sources.list (look at the script to find out
which repos you need to add)
Fluxion
Once again, type the following:
sudo ./fluxion
This time it should run just fine, and you would be asked a few very simple questions.
- For the wireless adapter, choose whichever one you want to monitor
on. For the channels question, choose all, unless you have a specific
channel in mind, which you know has the target AP.
- Then you will see an airodump-ng window (named Wifi Monitor). Let it
run while it looks for APs and clients. Once you think you have what
you need, use the close button to stop the monitoring.
 |
| Fluxion using airodump-ng |
- You'll then be prompted to select target.
- Then you'll be prompted to select attack.
- Then you'll be prompted to provide handshake.
- If you don't have a handshake captured already, the script will help
you capture one. It will send deauth packets to achieve that.
- After that, I quit the procedure (I was using the script in my
college hostel and didn't want to cause any troubles to other students).
If you are with me so far, then you can either just close this website,
and try to use the tool on your own (it look intuitive enough to me), or
you can read through the test run that I'm going to be doing now.
Getting my wireless network's password by fooling my smartphone into connecting to a fake AP
So, in this example run, I will try to find out the password of my
wireless network by making my smartphone connect to a fake AP, and then
type out the password in the smartphone, and then see if my Fluxion
instance on my Kali machine (laptop) gets the password. Also, for the
handshake, I will de-authenticate the same smartphone.
PS: You can probably follow this guide without having any clue how WPA
works, what handshake is, what is actually going on, etc., but I suggest
you do read up about these things. Here are a few links to other
tutorials on this website itself that would prove useful (the first two
are theoretical, yet nice, the third one is a pretty fun attack, which I
suggest you try out, now or later):
Anyways, with the recommended reading material covered, you can comfortably move on to the actual hacking now:
The real stuff begins!
This section is going to be a set of pictures with captions below them explaining stuff. It should be easy to follow I hope.
 |
| Select language |
 |
After selecting language, this step shows up.
Note how I am not using any external wireless card, but my laptop's internal card.
However, some internal cards may cause problems, so it's better to use an
external card (and if you are on a virtual machine you will have to use an external card). |
 |
| The scanning process starts, using airodump-ng. |
 |
You get to choose a target. I'm going after network number 21, the one my smartphone
is connected to. |
 |
| You choose an attack. I am going to choose the Hostapd (first one) attack. |
 |
If you had already captured a 4-way handshake, then you can specify the location
to that handshake and the script will use it. Otherwise, it will capture a handshake
in the next step for you. (A tutorial on capturing the handshake separately) |
 |
If you didn't capture a handshake beforehand, then you get to choose which
tool to use to do that. I'm go with aircrack-ng. |
 |
Once you have a handshake captured (see the WPA Handshake: [MAC Address] on top, if it's
there, then you have the handhake), then type 1 and enter to check the handshake. If everything's fine,
you'll go to the next step. |
 |
Use the Web Interface method. I didn't try the bruteforce thing, but I guess it's just
the usual bruteforce attack that most tools use (and thus no use to us, since that's
not what we are using this script for). |
 |
This offers a variety of login pages that you can use to get (phish) the
WPA network's password. I went with the first choice. |
 |
After making your decision, you'll see multiple windows. DHCP and DNS requests are being handled in
left two windows, while the right two are status reporting window and deauth window (to get users
off the actual AP and lure them to our fake AP) |
 |
In my smartphone, I see two network of the same name. Note that while the original network is WPA-2
protected, the fake AP we have created is an open network (which is a huge giveaway stopping most people
from making the mistake of connecting to it). Anyways, I connected to the fake AP, and the DNS and DHCP windows
(left ones), reacted accordingly. |
 |
After connecting to the network, I got a notification saying that I need to login to the wireless network.
On clicking that, I found this page.
For some people, you'll have to open your browser and try to open a
website (say facebook.com) to get this page to show up. After I entered
the password, and pressed submit, the script ran the
password against the handshake we had captured earlier to verify if it is indeed correct. Note how the
handshake is a luxury, not a necessity in this method. It just ensures that we can verify if the password
submitted by the fake AP client is correct or not. If we don't have the handshake, then we lose this ability,
but assuming the client will type the correct password, we can still make the attack work. |
 |
Aircrack-ng tried the password again the handshake, and as expected, it worked.
We successfully obtained the password to a WPA-2 protected network in a matter of minutes. |
If you like the post please share it ... :)